I plan to flush the A/C system and replace the heater core with an electric heater. Plus, there are problems with the blower motor and who knows what else. Basically I need to take the whole thing apart. I finally bit the bullet and started taking the dash out. There are only about 4 screws and one nut holding on the dashboard, but it's certainly not that simple. I pulled out the manual and look up dashboard removal, and to my surprise, the first step is to remove the sun visors! Wha?! Eventually it makes sense though because you have to remove a headliner to get access to the panels on the pillars. Then with those removed you can get to two of the dash screws. The other two screws and the nut are easy to remove, but I'm still far from being done.
The next step is removing the steering wheel. Quickly I find out I don't have the 24 mm socket to do the job, so I'm sunk for the night and pick one up on the way home from work the next day. There are a surprisingly large amount of wires going into the steering column. Luckily it's only three plugs that need to be disconnected. After I get this out of the way I find something peculiar. The steering wheel would make this funny squeaking noise when you turned it. It turns out that was due to a broken off reciprocating saw blade that was jammed into a clamp that was scraping on the steering shaft. I've got no clue why it would have made it in there, but no more squeaking.
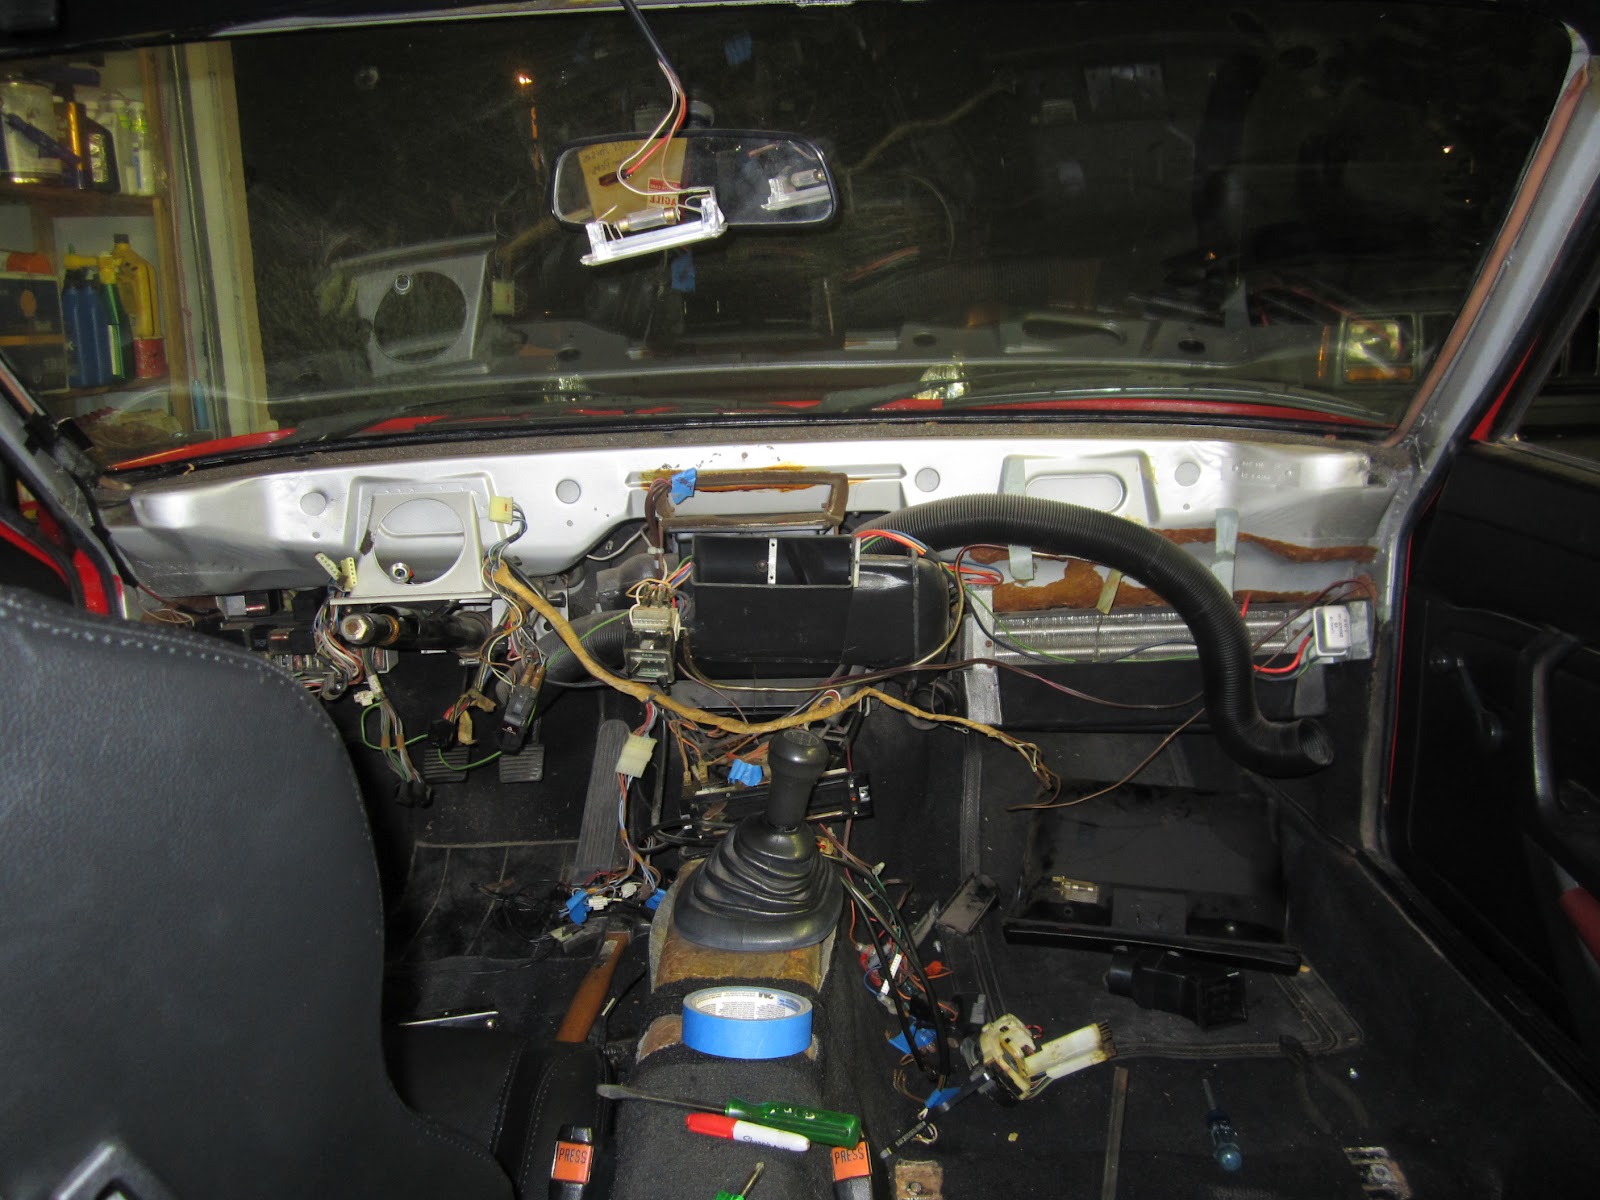
The gauges were pretty easy to get out, but there's a nightmare of wire connections. Every wire is labeled, but it's still going to be a trick putting everything back together. With that out of the way, the dash come out! If you look at the picture below, this is the point where most people would wonder what they had gotten themselves into. I am one of those people.
One of the problems with the car was that that odometer stopped working. The speedometer still works, so I've been hopefull I can get it fixed. As it turns out, it was a simple fix and based on how easy it was to find help on how to fix it, I think all 924's had the same problem at some point in their lives. Here's the freshly removed gauge.

There is a small plastic pinion gear that I've already removed in this picture that interfaces with the white worm gear near my thumb. The pinion gear either slides down the shaft until the gear teeth don't mesh anymore, or it cracks and stops gripping the shaft. Mine had done both of those. This is a pretty crappy picture, but trust me, there's a crack in it.

The shaft it's supposed to be turning feeds directly into the number cluster, so if you spin it, the numbers turn. I thought it would be cool to be able to keep track of how many miles I put on the car since the conversion, and since the title already is marked "box C" (odometer discrepancy) with 75k miles on it, it doesn't really matter if I change the reading. The car is new enough that the numbers won't turn backwards, but I'm only 3500 miles from a round 50k so I shoot for that. I attach a nail to the shaft with a piece of heat shrink tubing and it's not too difficult to turn by hand. I don't really want to spin it with a drill since I don't want to risk breaking it and having to pay $400 for a new one.

An hour later and I'm rolling over to 50k miles. I got the new gear pressed on there with a little epoxy and I was able to roll it the rest of the way to 50k with the normal input shaft! For any Porsche people out there trying to do the same repair, it required a C clamp to push the new gear on there. I also put a plastic spacer between the gear and the number cluster housing because the shaft can slide through the whole assembly, and if that happens the gear will disengage. I might have loosened things up when I tried to push the gear on by hand and didn't support the other side of the shaft, so the shaft slides through the number assembly with relative ease. I'd read about other people suggesting the spacer and I definitely think that'll save me from taking this all apart again in the future.

The next step in the deconstruction was to get the heater vent assembly out. As expected, once it was on the table I found the secret side door that allows you to slide the heater core out without removing the dash like I did. But that's okay, it was good to get it all cleaned up. All of the weather stripping turns to dust when you touch it, and the inside of this thing was remarkable filthy, and I mean dirty! There was residue in there that seemed like engine grease! With all new seals and a clean interior, I'm gonna be a lot happier when I open the vents.
The other interesting thing I learned from this whole process is how the ducting works. The car has heat and AC, but they are completely separate systems! There are 9 vents: 4 for AC, and 5 for heat.
The heater system draws air in through the clam shell on top in the picture above. There's a fan right inside that blows air through the heater core and out to the vents. The left and right ducts and the defroster are always getting airflow, and the two foot vents have a damper. As far as I can tell, you can't recirculate the air, but I may be wrong. Hopefully the electric heat will be sufficient without the recirc option, but I am in AZ so how bad could it be? I tested the motor and it spins, so there must just be a problem with the switch or wiring.
The AC system (which is the next piece to come out) is located behind the glove box and suck air in from there (no fresh air option). A separate fan sucks air through the evaporator and sends it down two ducts. The smaller of the two goes to a vent below the passenger side dashboard. The larger one serves the driver's side under dash vent and two center vents. There's no damper, so you'd have to close off vents to reroute if you wanted. The wiring looks suspiciously different, so I'm thinking the car didn't originally have the AC option and this was added later. However it worked out, I'm definitely looking forward to the crotch level vent that I've only ever enjoyed on my friend's early 90's Cherokee!