I've been having a battle with the brakes ever since I bought the Porsche. I knew they didn't work well before buying it, but figured all it would take is bleeding some trapped air out. Well, when I got her home, I find out one of the bleeder screws is broken off. So that explains why the spongy brakes hadn't been fixed. The next problem was finding the correct bleeder screw replacement. Then to get the broken one out I had to heat it with a torch, which required rebuilding the wheel cylinder.
Okay so I had that all done a while ago and never had a chance to finally bleed the brakes. Well I finally got to it a week or so ago and can't get it to work. The way it normally works is you push down the brake pedal to build pressure in the brake lines, then crack open the bleeder screw and let the air bubbles flow out. You keep doing that until it's all fluid and no air coming through the lines. I had my wife pumping the pedal while I worked the screw open and closed, and to my dismay there are only spurts of air coming out and no fluid. I finally get the idea that maybe the cylinder is dry and leaking and needs to be primed, so I take it out again, fill it up with brake fluid and get it all lubricated and put it all together. Still nothing but puffs of air even after pumping 50 times or so.
A week later I've tried a few other methods of pumping the brake with the same results, but now a friend has lent me his vacuum bleeder. Basically, this thing works backwards of how it works when you pump the pedal. You draw a vacuum on the outside of the system, crack open the bleeder screw, and that's supposed to pull fluid down from the master cylinder into the brake lines. Still no luck. Just air!
Then I get a brilliant idea. The only other way I've heard of bleeding a system is to use a power bleeder. This works by using air pressure to force brake fluid into the lines and gurgle out the master cylinder. Too bad these cost $90 at Auto Zone. But I've got a plan. I take the tank from the vacuum bleed kit and fill it with fluid. Then I hooked one hose up to the bleeder screw and the other end I plugged with a nozzle from my air compressor. I set the regulation to 20 psi and let her rip! I got my wife to keep an eye on the master cylinder reservoir so she could warn me if I created a geyser. She looked a little worried when I put on safety glasses. (shouldn't she just be glad I was wearing them and not upset that I felt I needed to wear them?)
Operation was a little slow, but soon we could hear bubbles hissing through the master cylinder and you could see fluid going in on my end. I had to squeeze the tank from the vacuum kit to keep it from misting all over the place. I also briefly tried 30 psi and that just turned into a mess and I quickly went back to 20. After 5-10 minutes, the master cylinder tank level had risen a little bit, but a check of the brake pedal proved to be nice and solid! I couple more pumps and we were able to get the last remaining bubbles out of the system and I think I'm good to go!
Monday, April 30, 2012

Wednesday, April 25, 2012
Compare and Save!
There are quite a few online stores that sell electric vehicle stuff. It's not a surprise that a lot of it is just stuff they found somewhere else and marked up on their site. A lot of the time they shrink, blur, or orient the images so you can't see the part number on the label so it's harder to find it online, but if you're clever enough you can usually find it. I've been looking at a lot of stuff lately that falls into this category and was thinking about my wife's favorite blog site called Regretsy. One of the things the writer does is compare supposed hand crafted items to mass produced items sold somewhere else online to show you how bold some people can be in their markup attempts. So here's my EV variant of Compare and Save!

OR

You save $87.88 !!!
To keep your motor running cool, add forced cooling with a blower fan. You can buy it here:

OR

You save $408.89 !!!
You can't power all the original gauges and lights in your car with the 150v battery pack, so you need one of these DC-DC converters to get 12 volts. This one's actually a lot cheaper than other version even at this EV store, but you could buy it here:

OR

You save $63.31 !!!
Your braking power is normally "boosted" off of vacuum produced by your engine. In order to maintain your braking power you need a vacuum system that you could buy here:

OR

You save $323.88 !!!
Edit: This pump didn't actually work! You saved too much by buying it. See this post for a better option (that actually costs less in parts but requires a little fabrication).http://electricporsche924.blogspot.com/2013/01/exciting-day-and-new-challenge.html
So in just 4 items I've already saved around $900 by shopping around! But can you put a price on convenience? Granted not all of these are direct comparison. Some of these are kits with a few bolts and hoses and I'm just comparing with the most expensive part of the system, but you get the idea.
But seriously, check out www.Regretsy.com because it's pretty awesome!
Wednesday, April 11, 2012
WarP 9 Motor Performance Predictions
Before I start, I want to make it clear that any use of this
information to design your own car is done at your own risk. I take no responsibility for anything you
choose to do with this data. If your car
doesn’t work the way you want it to, that’s not my fault! Okay, with that behind me let’s get into it.
I am still waiting on my motor adapter plate to get
finished, so progress is still slow. In
the meantime, here’s some info on motor performance that might be interesting
to you. Before I jumped into this project,
I wanted to have a good prediction of the performance I would be getting. I didn’t want to start driving and realize I
should have started with a different car, motor, battery pack, controller, or anything else. One very important piece to
that puzzle is knowing how much torque you can get out of your motor. More importantly, I needed a torque-speed
curve. I’m only going to discuss the
WarP 9 here, but I looked at a few other motors as well (mentioned in my last
post).
Netgain’s website has a lot of these charts and tables available
for you to use. Here are the links for
the WarP 9 data for motors manufactured after 7/1/10.
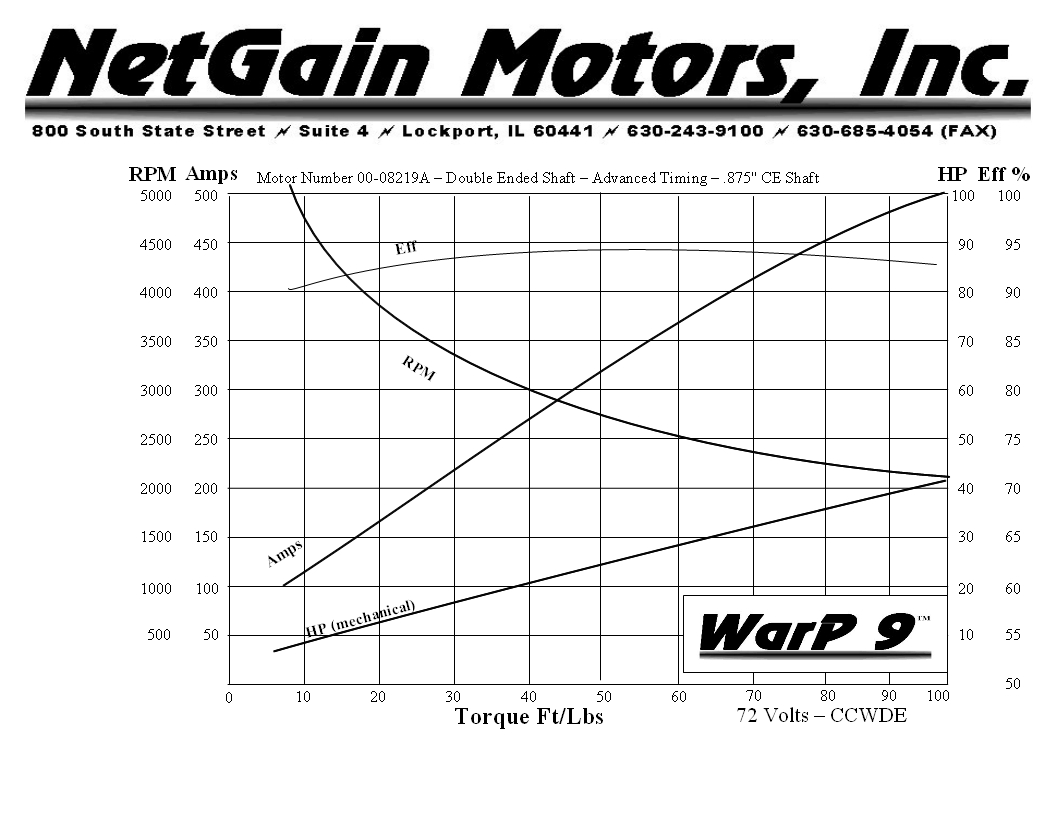
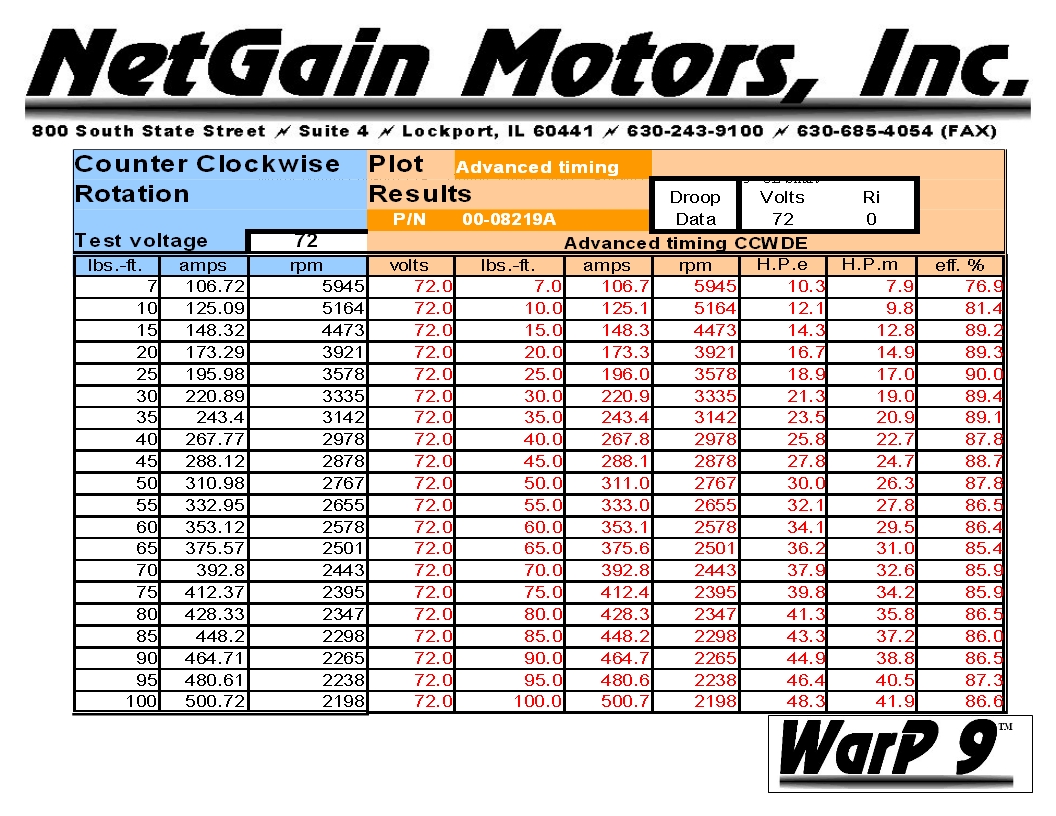
Unfortunately, the data only goes up to 500 amps. For a lot of people, this is entirely
adequate since they have a controller rated for 500 amps output to the
motor. If you intend to drag race, that’s
not going to cut it. Electric drag
racers commonly run 1000-2000 amps through their motors to get more torque. So how do you figure out how much torque you’re
going to get beyond 500 amps? There is a
common rule for series wound motors that says the torque is proportional to the
current squared. The equation looks like
this:
Torque = Constant x Current^2
From Netain’s data, at 500 amps you get 100 ft-lb of
torque. Using that data point, the
constant can be calculated to be 0.0004, so now you get this equation:
Torque = 0.0004 x Current^2
Let’s say you want to know the torque output at 1000
amps. With that equation, you would
predict 400 ft-lbf…sweet! Too bad that’s
not what really happens.
Okay, if you plot out the data, it looks like a fairly
straight line, so let’s just use the slope of the last two data points and see
what happens. You get a linear
relationship that looks like this:
Torque = 0.2486 x Current – 24.3
Using this relationship, at 1000 amps you would predict 224
ft-lbf. Unfortunately, you can’t count
on that either. So why can’t we use
either of these methods? Well you can if
you aren’t extrapolating the data too far from the actual data, but doubling
the range is out of the question. The
problem is called saturation. First let’s
discuss how a motor works.
Inside the motor you essentially have electromagnets. When you were a kid, did you ever wrap wire
around a nail and hook it to a 9v battery to pick up paper clips? The force coming from an electromagnet is
proportional to the number of turns (windings around the nail) multiplied by
the current going through the wire.
Since a series wound motor uses electromagnets for the stator and the
rotor, you get a force proportional to the current squared. But you can’t just keep increasing the
current and expect the square relationship to continue indefinitely.
When you apply current, you create a magnetic field. Anything made of iron has low permeability,
meaning the field flows easily through it…sounds like something from Star Wars. But it can only flow so much. Similar to a garden hose, at some point,
opening the valve more doesn’t produce any more water flow. This phenomenon in the electromagnetic world
is called saturation. Certain areas of
the iron core used in the motor’s rotor and stator will start to saturate as
the field is increased. At this point,
the magnetic field (or flux) will have to find another path, which is probably
through air. If it doesn’t pass through
the iron, you don’t get usable force out of it.
Eventually the entire part will become saturated and no matter how much
current you apply, the force will not go up any more. Okay, enough with the physics lesson. This is what I did to solve the problem.
I decided that the saturation could be accounted for by
making the exponent in my first equation a variable instead of a constant. That variable should be a function of current
and inversely proportional to it (i.e. it decays with higher current). I found a few bits of data on the internet for
current above 500 amps and fit it in with the Netgain data. The result looks like this:
Torque = Flux Constant x Current^Exp
Exp = 2.0615 – 0.0002 x Current
Flux Constant = 0.00051
This is the result. You can see that the equation fits the Netgain
data fairly well, and as would be expected, the slope gets lower as the current
gets higher. If anyone out there has
good data on the current WarP 9 motor, please let me know and I can use it to
enhance this graph. You can also see
from this graph that using the squared rule does not fit the data well at all.

The next piece of the puzzle is the torque speed curve. Why do I need to know this you ask? Well this tells us how fast the motor will
spin with a given voltage and current.
You can use it in a variety of ways.
Let’s say you know you need 50 ft-lbf of torque to climb a hill in a
certain gear and you want to do it at 50 mph.
You could look at this graph and determine how much voltage you need to
supply to the motor to achieve this.
From a different angle, if you want to know how long you will have your
maximum torque in a certain gear, you can use this chart to determine that as
well. Again, we want to extrapolate this
data beyond the range of what’s provided by Netgain.
We’ll start with the governing equation. It is commonly accepted that RPM, Voltage,
and Current are related with this equation:
RPM = K x Voltage / Current
where K is the motor constant. If you use this equation to calculate K for
the Netgain data, you will find out that K is, in fact, not a constant. If you plot K versus Current, you will find
that the relationship is fairly linear.
That means we can easily calculate K as a function of current. I found that the data matches a little better
if you split it in two sections and use a linear relationship for K above 300
amps and a polynomial relationship less than 300 amps. You can see the curve fits in the following chart.

From this, we can get the following equation for K:
K = -0.00006 x I^3 + 0.0809 x I^2 – 9.3578 x I + 8982.3 For I < 300 Amps
K = 17.69 x I + 6404.8 For
I > 300 Amps
In the next chart I’m comparing the actual data with the
calculated data and you can see it fits quite well.

From here you can extrapolate even further and create curves
for various voltages.

And now I'm ready to make my performance predictions.
Thursday, March 29, 2012
Motor Choice
There are lots of electric motors out there and there’s a
lot to consider when picking one out.
Most people, I think, have a misunderstanding of what will be best for
them. Here’s a compilation of what I’ve
learned and how I chose the WarP 9” motor.
Brief
Overview of Motor Types:
Series Wound
DC Motors – These motors are by far the most popular among EV conversions. The reason for this is that they are
relatively cheap and produce a large amount of torque for a given amount of
current. This means you need less
current to get your car moving. Since
current is somewhat of a commodity in the EV world, you get more bang for the
buck with this motor. In addition, a
relatively inexpensive and simple PWM controller is used to drive this motor. These motors are basically the same as the
motors used in forklifts except that they have been modified for higher voltage
and higher RPMs. Some people even get
used forklift motors for their car since they can be quite cheap.
DC Permanent
Magnet Motors – These motors operate similarly to the series wound motors
except that they have permanent magnets for the stator instead of a coil. They do not produce as much torque for a
given current when compared to series would motors. They also are probably more susceptible to
high temperatures than series would motors, though I don’t know that for
sure.
AC Motors –
These motors are driven off an alternating current. You achieve greater efficiency with these
motors and can easily incorporate regenerative braking, which is why I think
they are used on most hybrid cars. The
downside is the controller for this motor is complex and expensive.
Comparison
of Series Wound Motors:
I picked the
series would motor type due to the cost involved and the high torque output vs
current as mentioned above. The next
question is what brand and size. I’ll
assume that all manufacturer’s motors are equivalent in quality, reliability,
etc, so this question is more about what size and winding parameters do I
want. I’m going to compare 4 motors that
are popular among EV conversions: Impulse 9, Warp 9, Warp 11, and ADC 9. The three 9 inch motors are approximately the
same diameter but are wound differently.
The Warp 9 and 11 are supposedly wound similarly but are different
diameters. One thing to remember is that
the power you get in is the power you will get out (neglecting variations in
efficiency, which are similar for all motors).
9 Inch
Motors - Changing the windings affects the speed (RPMs) of the motor for a
given voltage and current. This means
that one motor will spin fast with low torque and another will spin slow with
high torque since the power in has to equal the power out. FYI, power in is the voltage multiplied by
the current and power out is equal to the torque multiplied by the rotational
speed. Depending on how much voltage
and/or current you can supply to the motor in addition to how quick you want to
accelerate and the desired top speed will affect which of these is best for
you. The Impulse 9 is wound for higher
speed and lower torque, the ADC 9 is wound for higher torque and lower speed, and
the Warp 9 is somewhere in the middle.
Warp 9 vs
Warp 11 – Supposedly these two motors are identically wound. If that is so, then for a given force between
the windings (the field and armature) will produce a different torque because
of the different moment arm (diameter of the motor). This means for a given internal force, the
Warp 11 will produce around 20% more torque than the Warp 9. Consequently due to the conservation of power
rule, the speed of this motor will be slower in the 11” motor than that of the
9”.
The chart
below shows a comparison of motor RPM vs Current at a constant voltage. Up to about 500 amps this is based on
manufacturer’s published data. More info
on extrapolation later.

The next
chart shows a comparison of torque vs RPM at a constant voltage. Again, up to about 500 amps this is based on
manufacturer’s published data.


I’ll start
with a typical conversion setup. 144
volts is a common battery pack size because it allows you to use most of the
base model controllers and is easily achieved with 6 or 12 volt lead acid batteries. We’ll also
assume you have a 500 amp controller and the batteries are sized to allow you
to drive 500 amps to the motor. Many people would
assume you can get 154 ft-lbf for as long as you keep your foot on the
pedal. If this were correct, you could
make it from 0-60 mph in a blazing 4.75 seconds. I see a lot of people on evalbums.com who are
building their car with very similar specs and expecting 0-60 in under 6
seconds. I’m sorry to tell you that this
is not going to happen.
Here's what is more likely to happen. With 154 ft-lbf of torque coming from the motor, you can easily peel out in 1st gear, but it won't last for long. I’ll assume your
pack voltage sags to 120 volts at 100% duty cycle from the controller. At this point you have 60 kW of power in and
we’ll assume you get the same power out.
At 154 ft-lbf, the maximum motor speed is 2300 RPM before you reach your maximum power output. If your overall gear ratio is 14:1, you are
only traveling 12 mph when the torque will begin to taper off. So you change into second and get a new burst of
speed, but that gear starts to runs out at 21 mph. There are a lot more factors than I
previously mentioned, but you’ll find that you can easily spin the wheels in 1st
gear, but it takes you about 9 seconds to get to 45 mph (if you start in 2nd
gear) and an excruciatingly long 20+ seconds to get to 60 mph. Here’s a plot of a simulated run of the first
10 seconds if you shift at 3000 rpm. I’ll
describe more of the parameters I used in a future post on performance
predictions.


The Warp 9
was redesigned in 2010 and I’ve seen groaning on some forums from
people who didn't like that Netgain lowered the output torque for a given current. Well, they did it for a reason, and I presume it’s
exactly the sort of thing I described above.
Targeting the largest audience who use a low voltage controller, the
newer designed Warp 9 will give you a good balance of peak and high speed
torque.
So what can we conclude from all this data? If you are not running a high voltage system, you will probably be disappointed with the performance of a large motor. It also tells you that you need to do some math if you really want a high performing vehicle. Just putting a big motor (or lots of batteries for that matter) in your car will not make it fast if you don't apply it properly.
For me, I
want more of a hot rod, meaning more off the line torque. That’s why I picked the Warp 9 over the
Impulse 9. But in order to meet my 0-60
goals, I was forced to consider a higher than typical battery pack voltage and
controller current. After figuring out
what was economically feasible for me, this motor gave me the fastest 0-60
time when compared against the ADC 9 and Impulse 9. If I were using a different battery pack or controller, that may be different. Like I’ve said before, more info
to come in a future post on performance predictions.
Tuesday, March 27, 2012
New Seats
There comes a point in every car's life when the seats get a little worn down. That point had well been reached long ago for my porsche...


I also started working on the back seats. They're essentially a vinyl sheet that's glued to a piece of molded foam that is glued into the back. It was essentially peeling up all around the sides and I didn't think it would glue back down so I made some sheet metal brackets to cinch it down. Here's what the seat looked like when I got it.

Here I've peeled it out and cleaned the sheet metal up a bit.

And here are the brackets I made.


Sunday, February 26, 2012
Motor Coupler Part 2 - Fabrication
The last post I told you about the coupler I designed. This next section is how it was made. As an engineer, I have a lot of experience putting lines on a paper. Turning that into a real object is an entirely different thing.
The only way to make this kind of part is on a lathe. My friend, Larry, graciously let me use his lathe and provided all the advice and help I needed to get it done. Here's a picture of the setup he has, plus a reminder of what the part looks like that we're making.

 The first tidbit of info is that stainless steel is easier to machine than low carbon steel and easier to get a good, smooth, surface finish. The same goes for aluminum. I didn't want to make my part from aluminum for a couple reasons, and had already bought a big block of cold rolled low carbon steel. Oh well.


Ok so the plan of attack is to rough cut all the dimensions, but leave a little extra material for later. The reason for this is after extended periods of heavy cutting, it's possible that the part will move in the chuck. If you do a precision cut of one surface and the part shifts, you will no longer have the concentricity or perpendicularity that you need. If you do all the finishing cuts, which are lighter loading on the part, you will have a much better result.
The next day we spent another 3 hours machining just one
feature. You can see the 1.675 diameter on the right side of dimensioned picture (above), I
spent the whole evening knocking down that diameter. Instead of being
0.600 inches long it’s more like 2.5 inches long. We had to make it that long
so the chuck could hold it well and still fit a tool between the chuck and the
.00000 surface in the next setup.
The next day we met, we spent another 4 hours and made a lot more
progress. The part was flipped around so the chuck is holding onto the
1.625 diameter. First I faced off the end (left side in the picture), then
hogged out the 1.875 diameter on the left side. Third we bored out the
0.875 diameter. It was surprisingly quick to make a ¾ inch hole 2.5
inches deep in a piece of steel. Now that 80% of the material was gone it
was time to retighten the chuck and make some final cuts. The 0.875 diameter was opened up.
Then the .00000 face was skimmed off. Then the 3.740 diameter was
cut. I had the flywheel there, so we were able to check that it was a
tight fit. And that’s where we stopped for the night.

Finally we're to the last critical dimension, which is the hole that the motor shaft fits into. You can see me cutting that dimension in this picture using a boring tool. Being in inner dimension, it is tough to get a good surface finish and tough to check the diameter accurately. You can use a micrometer, and unless you have some really specialized tools you can only use calipers to measure down to 0.001" accuracy. That's where the gauge pin I made earlier helps out. Once the hole is nearly large enough, you run the tool in repeatedly without changing the radial position. This skims off more and more of the high spots on each pass and the hole will slowly get bigger. This happens because the cutter is somewhat V shaped, so it leave small grooves. On the outside dimensions I used a flat tool for the final cuts, so you don't see much of this behavior. After taking a long time to close in on the final dimension, the gauge pin is very tight, but fits. Here you can see the final part and a few pictures of it installed on the motor and the flywheel. The next step will be to have the keyway broached at a machine shop.


Wednesday, February 8, 2012
Motor Coupler Part 1 - Design
This post really shows off my engineering side. All day long I help design parts and create drawings for them. This project is an opportunity for me to do all that plus figure out how to actually make the part. This sort of project always gives me a deeper appreciation for the people who bring form to things I look at all day on a computer screen. As a warning to all of you, this could get boring. Then again, if you're like me this could be pretty interesting...or maybe still boring. Enough said.
The electric motor has to somehow transfer power to the transmission. Some people choose to set up this connection clutchless. In this case, the flywheel, pressure plate, and clutch disk are removed and a single coupler attaches to the motor shaft and the transmission shaft. Benefits to this system include simplicity and low rotating mass (i.e. more apparent torque for acceleration). The downfall here is that changing between gears could be slow. To other option, of course, is to retain functionality of the clutch, in which case you need a coupler that attaches the motor shaft to the flywheel. The benefit here are that you shift as quickly as you would have been able to with the gas engine. The downside is that the coupler design and fabrication is much more challenging and you have higher rotating mass (i.e. some of the torque that the motor produces is used accelerating the mass of the rotating components and not as much is available to accelerate the car). Based on my friend's experience, I decided to incorporate the clutch. And here it is.

In this next picture you can see how it fits in with the motor and transmission. The motor is on the left. You can see the coupler attached to the shaft and the flywheel attached to the coupler. You can also see the transmission (or in my car's case the midshaft) that is piloted to the coupler. This shaft must be supported with a pilot bearing so that it does not flex when you disengage the clutch, which could cause all kinds of problems.


So we have a couple important features here. First, the ID of the coupler must be a very close fit with the motor shaft or it will cause vibration. To improve the fit, I've added a slot in the coupler and a bolt that will clamp it to the motor shaft for a slop free fit. Second, the face that the flywheel mounts to must be perpendicular to the motor shaft. If it isn't, the flywheel will wobble causing bad wear on the clutch parts. Third, the OD of the coupler pilots to the flywheel. This must be a very tight fit or the flywheel will be unbalanced. And fourth, the pilot bushing must be concentric with the motor shaft so that the transmission shaft is concentric with motor shaft. Still with me? Here are all the dimensions I used.

You can pay someone to build this for you for $500-600, but part of the fun for me is to figure out how to do this yourself. Luckily I have some very generous friends who have the equipment needed to make it and were willing to help me out. I have to give a big thanks to Larry for supplying me with around 12 hours of time on his lathe and just as much time in advice.
So now that we've got a design, it's time to start cutting chips. I went to the local metal store and picked up a 4 inch diameter bar of cold rolled (CR) steel. I got 9 inches figuring that would be enough to have two tries at getting it right. I probably spent at least and hour discussing this machining process with my friend to make sure everything turns out the way I want it. Considering how long this is going to take, this long conversation was well worth it. After all this discussion we cut it down to about 4.25 inches long. The shorter the piece, the less problem you'll have with wobbling, vibrating, etc. Plus, even at that length, the starting piece weighs over 15 lb.
Next up, how to make it...
The electric motor has to somehow transfer power to the transmission. Some people choose to set up this connection clutchless. In this case, the flywheel, pressure plate, and clutch disk are removed and a single coupler attaches to the motor shaft and the transmission shaft. Benefits to this system include simplicity and low rotating mass (i.e. more apparent torque for acceleration). The downfall here is that changing between gears could be slow. To other option, of course, is to retain functionality of the clutch, in which case you need a coupler that attaches the motor shaft to the flywheel. The benefit here are that you shift as quickly as you would have been able to with the gas engine. The downside is that the coupler design and fabrication is much more challenging and you have higher rotating mass (i.e. some of the torque that the motor produces is used accelerating the mass of the rotating components and not as much is available to accelerate the car). Based on my friend's experience, I decided to incorporate the clutch. And here it is.

In this next picture you can see how it fits in with the motor and transmission. The motor is on the left. You can see the coupler attached to the shaft and the flywheel attached to the coupler. You can also see the transmission (or in my car's case the midshaft) that is piloted to the coupler. This shaft must be supported with a pilot bearing so that it does not flex when you disengage the clutch, which could cause all kinds of problems.


So we have a couple important features here. First, the ID of the coupler must be a very close fit with the motor shaft or it will cause vibration. To improve the fit, I've added a slot in the coupler and a bolt that will clamp it to the motor shaft for a slop free fit. Second, the face that the flywheel mounts to must be perpendicular to the motor shaft. If it isn't, the flywheel will wobble causing bad wear on the clutch parts. Third, the OD of the coupler pilots to the flywheel. This must be a very tight fit or the flywheel will be unbalanced. And fourth, the pilot bushing must be concentric with the motor shaft so that the transmission shaft is concentric with motor shaft. Still with me? Here are all the dimensions I used.
You can pay someone to build this for you for $500-600, but part of the fun for me is to figure out how to do this yourself. Luckily I have some very generous friends who have the equipment needed to make it and were willing to help me out. I have to give a big thanks to Larry for supplying me with around 12 hours of time on his lathe and just as much time in advice.
So now that we've got a design, it's time to start cutting chips. I went to the local metal store and picked up a 4 inch diameter bar of cold rolled (CR) steel. I got 9 inches figuring that would be enough to have two tries at getting it right. I probably spent at least and hour discussing this machining process with my friend to make sure everything turns out the way I want it. Considering how long this is going to take, this long conversation was well worth it. After all this discussion we cut it down to about 4.25 inches long. The shorter the piece, the less problem you'll have with wobbling, vibrating, etc. Plus, even at that length, the starting piece weighs over 15 lb.
Next up, how to make it...
Subscribe to:
Posts (Atom)