Tuesday, September 25, 2012

Starting to fill the engine compartment

The motor is in the car and I actually spun the rear wheels with a 12 volt battery!  The other good news is I think I'm winning the war with black widows since I took out 4 females and 2 males last night (shudder).  It's amazing I didn't have nightmares last night considering they're the basis for all my childhood fears.  

With the motor in, it's time to start filling the extra space under the hood.  The A/C compressor basically only has one place it can go unless I get all new hoses.  It needs to go to the right of the motor if you're looking from the front of the car.  I got a 1/4 inch plate of aluminum to mount to the front of the motor.  While I'm at it I was figuring out how to mount the blower fan.  Since I plan to run the A/C off the main motor, when I idle at a stop light it'll be going about 700 rpm.  The motor wants to go 1500-2500 rpm to properly cool, so it'll need some help.  I got this 12 volt blower fan and mounted it to the aluminum plate blowing through a hole in it.  

You can see the hole here.  I just have to make an angled duct to turn the airflow down into the motor and cover up all the extra inlet holes.

Here's the bracket I'm working on for the compressor.  I took the old compressor mount and chopped off a bunch of features I don't need.  Then I welded some angle iron to it so it can mount flush to the aluminum plate.  There's an extra "foot" that you can see on the right side.  That'll attach to the motor mount to stiffen the whole thing up a bit.


Fits perfectly!  And even better, the A/C hoses still reach the fittings.  


Pulleys line up? Check
For future reference, I'm thinking of a row of 8-9 batteries in front of the motor and behind the AC condenser, which is kind of below the fan in this pic.  Gotta clear the sway bar too.  So many things to think about!


Belt going to clear the fan?  Check


Next up I've made some cardboard boxes the shape of what I think my batteries will look like.  The original plan was to use 60 of the 70 Ah Calb cells (SE70) and put about 26 of them in the front for weight distribution.  Well, they just a few months ago came out with the CA line of batteries that are supposed to be superior.  Only down side is they don't come in the 70 Ah size!  Well maybe 192 volts wasn't enough and I should go for 70 of the 60 Ah SE cells for a nominal pack voltage of 224.

Either way, I'd like to fit 140 lb of batteries up front, and that will take a surprising about of space.  I'm starting to think I can only get about 20-21 cells in there (~100 lb) without really cluttering things up, but that'll probably be okay.

Next up I'll be making the inlet duct to route the fan air into the motor.  I'm also preparing to buy about 400 parts from mouser and digikey to build the controller board and IGBT drivers.  More on that later...

Thursday, September 20, 2012

Motor Controller Part 1: Design

In order to get power from the batteries to the motor without using a big on-off switch, you need a motor controller.  Since I'm using a higher than "average" battery pack voltage, I need a high voltage controller.  I could just buy one, but what's the fun in that?  Plus I get the chance to save a few bucks since the HV controllers start around $2500.  The concept of building your own controller comes from my friend Joe who's already built his car and controller.  Actually, it goes back earlier than that.  There's a couple called Paul and Sabrina who sell a kit that they've developed over a number of years, and that'll be be backbone for my controller.  "Unfortunately," I've taken the high voltage path, so the kit won't work for me as is.  It needs to be modified with high voltage parts and while I'm at it, might as well throw in some higher current capability, right?  I'm not sure who to give the credit to, but Joe started on this path a while back and already figured out a combination of IGBTs and capacitors that should do the trick.  I'm going to use these high power parts with the control board that Paul and Sabrina have developed to make a higher power version.  (If you want to skip the boring lecture of the day, this is a good spot to skip down to the pretty pictures...)

So what is an IGBT you ask?  It's a high power switch, kind of like a transistor if you know what that is.  To control the power going to the motor, the IGBTs are turned on and off really fast so the motor only sees some fraction of the voltage available from the batteries.  The pulses are sent at a specific frequency, and the time on and time off are varied to change the apparent voltage to the motor.  For example, if it takes 1 millisecond to turn on and off and it spends 70% of the time on, the motor will see an apparent DC voltage of about 70% of the battery pack voltage.

These IGBTs are rated for 400 amps a piece and I'm using three of them.  The IGBTs don't share the load perfectly, so I wouldn't be able to drive 1200 amps without blowing something up.  The reason for this is that the resistance of each IGBT isn't exactly the same and they're run in parallel.  So if you ask for 1200 amps, you might get 350 amps through one, 400 amps through the second, and the third blows up with 450 amps.  There are a few other factors that affect how well they share the load that I won't get into, and my design is going to be far from perfect, so I'm tentatively planning to limit the max current to 833 amps.  There's another reason for that odd number.  The controller is designed to do 500 amps max, and it has a current sensor that it uses to narrow in on the current you are commanding.  By changing the sensor with another part number, the controller will think it's driving 500 amps when it's really driving 833.  That way I don't have to reprogram the microcontroller.

Okay, enough of the boring stuff.  Here are some pictures!  This is basically what it'll look like when it's done.  The big green things are huge capacitors.  The yellow things are the IGBTs.  The orange bars are copper bus bars that the big cables will connect to from the motor and battery pack.  The dark blue thing is a the current sensor.  The light blue block is the main controller board.  The red things are the IGBT drivers.
The capacitors connect to the bus bars using some sheets of copper.  The sheets need to be parallel to each other like that to reduce "stray inductance" (bad).  Having the posts of the capacitors up and down, and having an array of capacitors (instead of one big one) further reduces stray inductance.  The reason you don't want high inductance is that this causes voltage spikes.  Voltage spikes (if too large) will fry the electronics.  These capacitors and IGBTs are rated for 600 volts, so I'm hoping ~200 volts plus spikes are okay.

The IGBT drivers (red) have to be really close to the IGBTs.  If they have mismatched lengths, the IGBTs could turn on and off out of sync, which is really bad.  If one of them stays on longer than the others, it will sink the entire commanded current!  That's bad.


The plate on the bottom that the IGBTs are mounted to is a custom water plate.  The IGBTs aren't 100% efficient, so they create heat while they work.  I'm going to plumb liquid coolant through this block of aluminum to take that heat away.  A friend from work has a CNC mill who is going to help me machine it.  He's already got it coded, so I just need to get some time to go over there.  You can see a funny slot in the middle.  There's a temperature sensor that will fit in there and feed a signal back to the control board.  If, for some reason, it gets too hot, the microcontroller will back off on the power until it cools down.


The guy helping me mill out this water plate keeps telling me I'm going way overkill on the liquid cooling.  He happens to have built an electric car himself about 15 years ago out of an old Ford Fiesta.  His was significantly lower power/voltage than mine, so his controller was passively cooled (no fans).  All of the controllers on the market with this kind of power rating are liquid cooled, so that's what I'm going with.

I've got a lot of the pieces, so I'm hopefully going to start on the fabrication of all that structure you see in the pictures really soon.  I still need to order a control board kit and learn to solder, but that's for a post another day.

Wednesday, September 19, 2012

Dashboard Repair Part 2

We were treated to an unseasonably cool day a week ago (high of 80°) so I took the opportunity to work on my dashboard.  I hadn't finished this because it involves epoxying the edges of the vinyl cloth down to the dashboard and it smells too bad to do it inside and it's been way to hot to do outside (epoxy cures really fast).  But today was perfect.  I started on the windshield side that's hard to notice if I screw up.  I've got 4 small clamps, so I'm limited to about a foot at a time.


That worked out well so I started on the front side.  I'm using small balsa sticks to help distribute the load.


It's 8 minute epoxy so after 2 hours or so of going in and out, this is the final product!  Looks pretty good huh?  I'm not sure you can see, but there are two patches that need to be spliced in that I'll do another day.  I also have to cut out the defrost holes.  Soon I can put the interior back together!


Thursday, September 6, 2012

Good News and Bad News

The good news is the motor is finally installed in the Porsche and supported on it's own brackets!  Bad news is that something I hoped never would happen has happened.  During the monsoon season, a batalion of black widow spiders have moved in to lay claim to the undercarriage of the car.  I managed to blast a few with brake cleaner and clear out all the webs, but I'll have to check back soon to see who made it through the first assault.

I didn't realize how long it was going to take to make this motor bracket.  The biggest issue is it involved putting the motor in and out and in and out to constantly keep checking dimensions, tacking parts together, etc.  Here it is installed in the car before I painted it.  You can see how careful I had to be of clearing the steering shaft, but I think I have at least 3/8 inch.


The next project was to finish up that flywheel adapter.  I never got around to making a pilot bushing, so now's the time since I can't put the motor in until that's done.  I bought a slug of phosphor bronze off ebay for a couple bucks and tackled it with the mini-lathe.  This is the perfect job for this little lathe.  I didn't realize that bronze turns to dust when you machine it, compared with curling off of aluminum or steel.  It's a lot easier to sweep up, you just have to try not to breathe it.


Here are the parts.  On the left is the flywheel adapter, in the middle is the bronze slug, and on the right is a tool I made to mimic the transmission input shaft.  


Here I've got it all chucked up and squared off.  I figured the ID would be the toughest part to do so I did that first.  As it turns out, the OD was a little harder.  It's supposed to be a light press fit into the coupler, and since an inner diameter is difficult to measure accurately without special tools, you're left to doing a lot of checking.  A good way to do it is to cut a short distance off the front until the part it fits in just barely slips over, then you know the rest needs to be slightly bigger.


Ok, the tool fits pretty good now.  I wasn't sure how loose or tight to make it.  You want it to do its job piloting the input shaft, but you also don't want it impossible to put the motor in.  Someone online was suggesting 1/32nd inch diametral clearance, but 0.032 inches seemed too much.  I think I ended with about 0.012 inches diametral clearance.  0.006 inches off center ought to be okay I think, and it was not easy or impossible to get the motor in later...just right.


The first try turned out to be a bust.  I must not have been paying attention and when I checked the fit in the flywheel adapter and it just barely slid in, but I'd machined the whole length of the bushing..  Since it's supposed to be a press fit, I'm hosed and have to try again.  Luckily I ordered enough bronze to get two tries out of it and I now I have a better starting point for the OD.  After slicing the end off, I machined the next one 0.0015 inches larger than the last and it was just right.  Here it is pressed into the adapter.


After this was done I mounted it on the motor and attached the flywheel.  A while back I'd rotated it around until I got the least vibration and marked it so I wouldn't forget later.  I also noticed it wasn't quite spinning flat, so now's the time to figure out what the problem is.  I bought a depth gauge and set it up to check the runout on the face of the flywheel.  If you don't know what that is, the total runout is how far up and down the surface goes when you spin it around (think of a warped record).  It turns out there was a 0.018 inch wobble from the highest to lowest spot.  Some quick action math tells me I need to put a 0.004 inch shim behind two of the bolt holes to fix it.  


Unfortunately, precision shims cost a whopping $25 for a pack of 10!  My 7 year old daughter reminded me that a soda can is like paper thin metal so I cut one up and found it's 0.0035 inches thick.  A lot cheaper, and I don't have to wait a few days for shipping.  I shave one to shape and fit it in there and now the runout is reduced to only 0.004 inches.  Good enough for me.  Next I hook up the pressure plate and see how the balance is.  It has three piloting pins, so three position options and there's definitely a preferred position.  I was surprised to see that some of the screws that were missing lockwashers were causing noticeable vibration.  With all the right pieces in place it hardly shakes at all!  Time to tear it all down, add loctite, lockwashers, and new fasteners to everything and put it all back together with the clutch disc.  A final spin up and I'm ready to put the motor in the car (hopefully for good).  It's a little more shaky after the rebuild, but it's not significant and hopefully it's just due to an imperfectly centered clutch disc.


I'm sure there will be plenty of time for a picture of the motor sitting in the car, and since I don't have on at the moment, that's all for now!  Next up will be making the clutch cable bracket and mounting the air conditioning compressor.  After that I need to make a shopping list of all the relays, contactors, potentiometers, fuses, shunts, DC-DC converters, etc. that will need to start filling the engine bay and get them on order.

Monday, July 9, 2012

Motor Adapter is in and the motor spins!

It's been a while since the last post.  Not because I haven't been getting any work done, but I've been delinquent on updating the blog.

I finally got one of the last pieces I needed to get the motor installed in the car.  The old engine mounts to a bellhousing and I needed an adapter plate that would allow my motor to mount to it instead.  A friend of mine at work knows a guy who owed him a favor and also happens to run a machine shop with CNC mills.  I bought a huge block of aluminum (15 inch diameter by 2 inches thick) and sent that plus a CAD model of the housing I wanted away back in February and 10 weeks later it came back weighing about a two thirds less.  The only downside is it cost $300 more than the free me and my friend were expecting.  Oh well...


When designing it, there were a few real important things to consider.  The most important was getting the motor lined up as perfect as can be with the drive shaft.  There are two alignment features that were part of the engine block that I needed to recreate.  There are also about half a dozen bolt holes, but due to space it wasn't very easy to accurately measure them all.  I decided to only dimension the alignment holes to the motor pilot hole and plan to drill all the bolt holes after I got it back.

Many vehicles have alignment pins, but mine have bolts going through them, so they're actually alignment cylinders.  In order to avoid having to pay for a 2.5 inch thick block of aluminum and a lot of extra machining I decided to press in some cylinders myself.  Of course, you can't just buy something like this so I borrowed my friend, Ara's, lathe and made some myself.  The fit was super tight, but with a clamp and a big hammer they both went in!  You can see them poking out in the pictures.

The other thing you might see is a block of aluminum sticking out the side (upper picture).  Before I bought the block of aluminum I hadn't modeled up the part yet and didn't measure something right.  As it turned out I would have needed a 17 inch diameter block to get all of the holes onto the part.  After figuring this out I decided to bolt a block on to catch the last of the holes.  It'll be on the bottom, so unless you're reading my blog you'll never know!

Another thing I wasn't sure of was what orientation I would want the motor when I put it in the car.  In the end I decided to have the machinist cut 8 mounting holes for the motor instead of 4 so I have an option every 45 degrees.

The next thing I did was try putting power to the motor!  I hooked up the flywheel to my new flywheel adapter and clamped a battery to it.  I was a little disappointed to see it has some vibration.  I took the flywheel off and hooked it up again, and it had about the same amount of vibration!  Looong story short, I was able to clock the flywheel differently and everything is really well balanced now, so the adapter alignment and flywheel balance are similar to the balance that the motor manufacturer put into the motor.  When you think about that, that's probably as good as you could hope for.

Next I started working on mounting the motor in the car.  The motor will have a band that goes around the center of it.  From that band there will be arms going to the left and right that attach to motor mounts.  I got some Jeep Cherokee mounts because they're a good shape and pretty cheap.  The motor mounts will bolt onto a pad that I'll weld onto the front crossmember of the car.  I started by cutting out those pads, which quickly became more complex than I originally thought.  It turns out the crossmember is curved and not flat, so I had to get creative in getting the shape just right.  But after a little while with the grinder they fit really nicely.  Next step will be to weld those in and bolt on the mounts, but that'll be next week.

Here is the band I've bent to fit around the motor.

Here is the tool I made to bend the band.  I wanted a smooth curve and not a bunch of kinked corners, and this did the trick. 

Here is the passenger side motor mount pad.

Here is the driver side pad and motor mount.


Still not done with this update!  I have been designing the liquid cooling plate for the motor controller for quite some time.  I bought a block of aluminum with the intent of making two of these (one for Joe) and then realized I didn't have a good way to cut it in half.  Six square inches of aluminum is a lot to cut through even with a reciprocating saw.  Luckily my father in law has a vertical band saw that did the trick.  I'll follow up with a post later on that shows how it'll look when I machine the flow passages.

And finally, I got some work done on the dashboard.  I bought some vinyl fabric a while back and trimmed it out to the right shape.  There are some dash overlays you can buy that do the same thing, but cost about 5x what I'm spending, so if this goes badly I can always revert to that.  The overlays just cover the upper half of the dash so that's what I plan to do here as well.  I sprayed the dash and the back of the vinyl with 3M spray glue, let them both dry for 5-10 minutes, then stuck them together.  I still plan to epoxy the edges down, but on the most part it sticks pretty well.  There were two areas that were impossible to stretch the fabric over, so I trimmed those sections with neat, straight lines so hopefully I can patch in another piece to fill the gap without more than a hairline joint.  So far so good!

Old

New

If you've read this far, you must truly be one of my fans...thanks!  I'll try and keep up more often so they aren't so long in the future, but I'm not making any promises...

Wednesday, May 30, 2012

Dashboard Repair Part 1

It's been a while since the last post, but I've still been making some progress.  I recently started an attempt to repair my dashboard.  The Porsche dashboards didn't stand the test of time well.  In fact, a friend of mine at work said he bought one the same year and color as mine when it was 4 years old and it already had cracks in the dash.


The options here are dash mat ($40), dash overlay ($150), refurbish ($400), new replacement ($1400 if you can find one), or something altogether different.  You can guess what I'm going with...I got this idea from a guy online who fixed up his MG dash.  The idea is to fill all the cracks with silicone, then glue a new piece of vinyl fabric over the top.  First step is to clean it up and flatten it out.  The edges of all the cracks are curled up, so simply filling them in wouldn't make a flat surface.  I sliced off the curled edges and dug out all the loose foam.

Now I'm ready to fill the cracks.  I got some black silicone, worked it into the cracks, and smoothed it over with a putty knife.  So far so good!


The next step will be to trim and glue the vinyl fabric on, but I have to wait for it to dry for a while so more on that later.

On another note, my adapter plate is nearly done!  I should be ready to fill this void with the electric motor soon.


Here's the nearly finished adapter plate.


Sunday, May 6, 2012

Dashboard Removal and Odometer Repair

I plan to flush the A/C system and replace the heater core with an electric heater.  Plus, there are problems with the blower motor and who knows what else.  Basically I need to take the whole thing apart.  I finally bit the bullet and started taking the dash out.  There are only about 4 screws and one nut holding on the dashboard, but it's certainly not that simple.  I pulled out the manual and look up dashboard removal, and to my surprise, the first step is to remove the sun visors!  Wha?!  Eventually it makes sense though because you have to remove a headliner to get access to the panels on the pillars.  Then with those removed you can get to two of the dash screws.  The other two screws and the nut are easy to remove, but I'm still far from being done.

The next step is removing the steering wheel.  Quickly I find out I don't have the 24 mm socket to do the job, so I'm sunk for the night and pick one up on the way home from work the next day.  There are a surprisingly large amount of wires going into the steering column.  Luckily it's only three plugs that need to be disconnected.  After I get this out of the way I find something peculiar.  The steering wheel would make this funny squeaking noise when you turned it.  It turns out that was due to a broken off reciprocating saw blade that was jammed into a clamp that was scraping on the steering shaft.  I've got no clue why it would have made it in there, but no more squeaking.

The gauges were pretty easy to get out, but there's a nightmare of wire connections.  Every wire is labeled, but it's still going to be a trick putting everything back together.  With that out of the way, the dash come out!  If you look at the picture below, this is the point where most people would wonder what they had gotten themselves into.  I am one of those people.


One of the problems with the car was that that odometer stopped working.  The speedometer still works, so I've been hopefull I can get it fixed.  As it turns out, it was a simple fix and based on how easy it was to find help on how to fix it, I think all 924's had the same problem at some point in their lives.  Here's the freshly removed gauge.


There is a small plastic pinion gear that I've already removed in this picture that interfaces with the white worm gear near my thumb.  The pinion gear either slides down the shaft until the gear teeth don't mesh anymore, or it cracks and stops gripping the shaft.  Mine had done both of those.  This is a pretty crappy picture, but trust me, there's a crack in it.


The shaft it's supposed to be turning feeds directly into the number cluster, so if you spin it, the numbers turn.  I thought it would be cool to be able to keep track of how many miles I put on the car since the conversion, and since the title already is marked "box C" (odometer discrepancy) with 75k miles on it, it doesn't really matter if I change the reading.  The car is new enough that the numbers won't turn backwards, but I'm only 3500 miles from a round 50k so I shoot for that.  I attach a nail to the shaft with a piece of heat shrink tubing and it's not too difficult to turn by hand.  I don't really want to spin it with a drill since I don't want to risk breaking it and having to pay $400 for a new one.


An hour  later and I'm rolling over to 50k miles.  I got the new gear pressed on there with a little epoxy and I was able to roll it the rest of the way to 50k with the normal input shaft!  For any Porsche people out there trying to do the same repair, it required a C clamp to push the new gear on there.  I also put a plastic spacer between the gear and the number cluster housing because the shaft can slide through the whole assembly, and if that happens the gear will disengage.  I might have loosened things up when I tried to push the gear on by hand and didn't support the other side of the shaft, so the shaft slides through the number assembly with relative ease.  I'd read about other people suggesting the spacer and I definitely think that'll save me from taking this all apart again in the future.


The next step in the deconstruction was to get the heater vent assembly out.  As expected, once it was on the table I found the secret side door that allows you to slide the heater core out without removing the dash like I did.  But that's okay, it was good to get it all cleaned up.  All of the weather stripping turns to dust when you touch it, and the inside of this thing was remarkable filthy, and I mean dirty!  There was residue in there that seemed like engine grease!  With all new seals and a clean interior, I'm gonna be a lot happier when I open the vents.
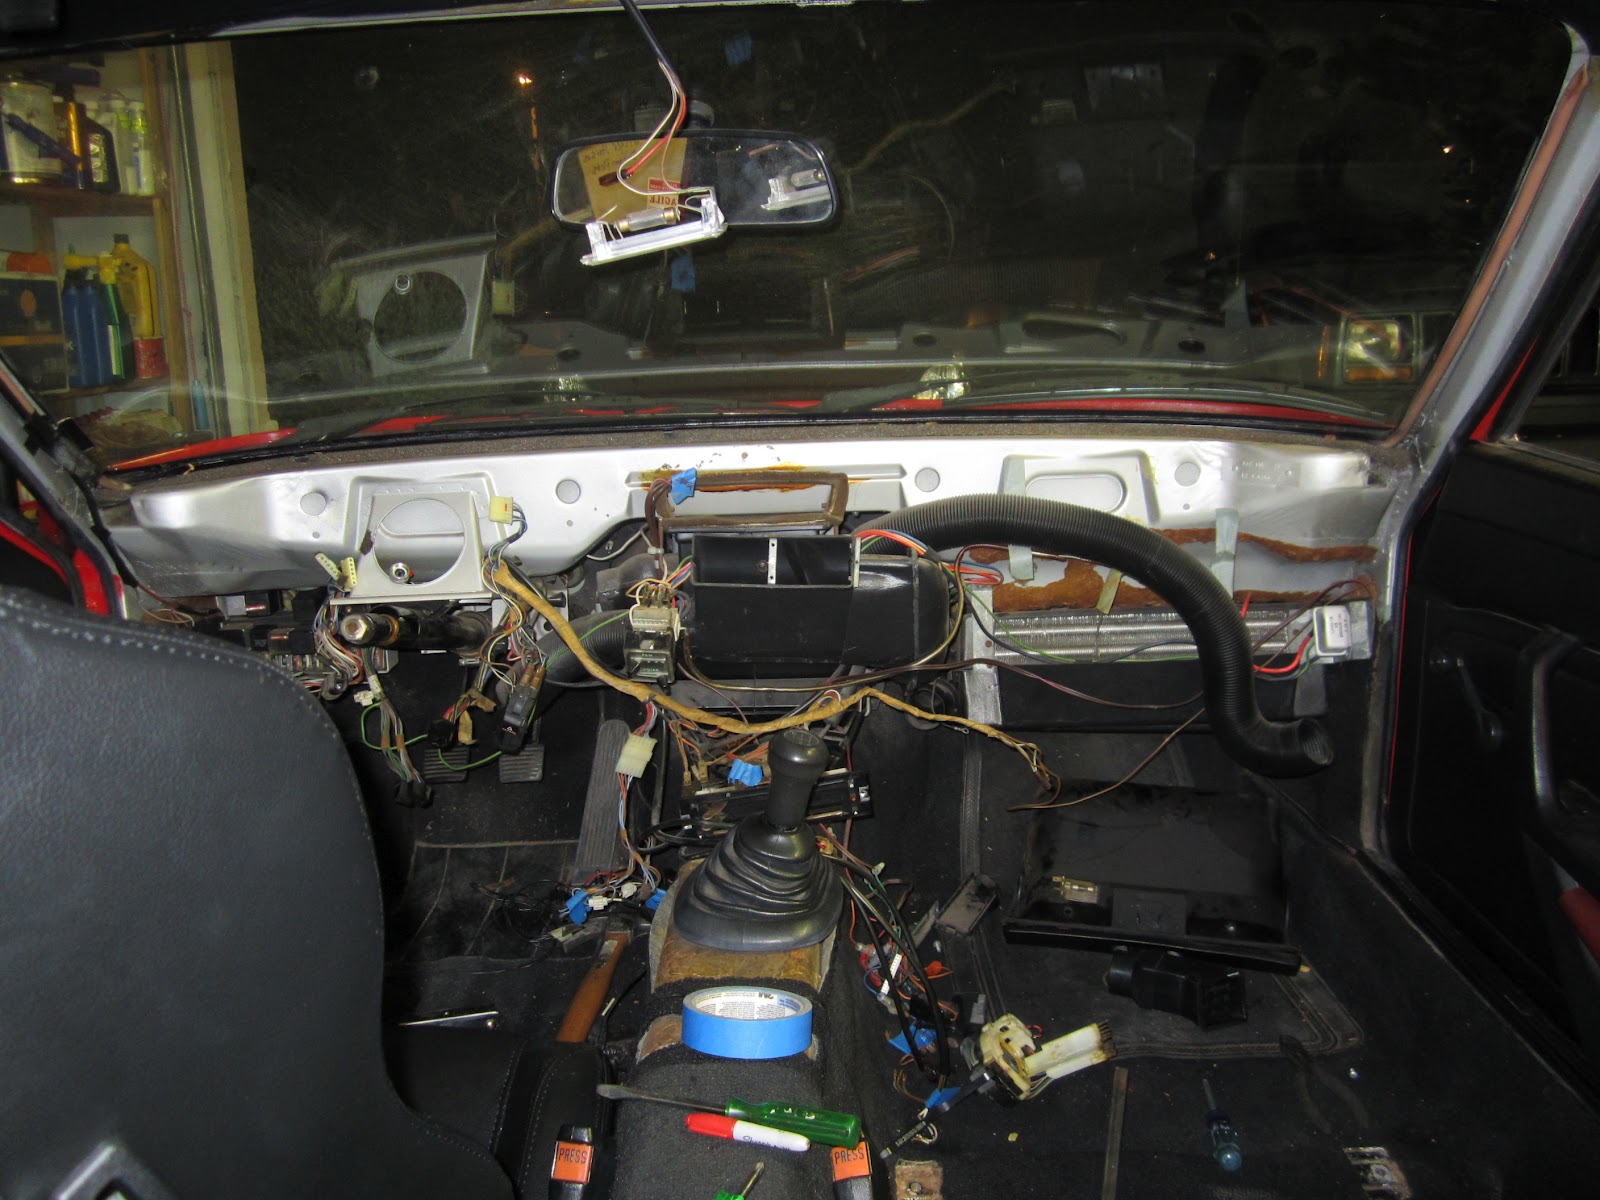

The other interesting thing I learned from this whole process is how the ducting works.  The car has heat and AC, but they are completely separate systems!  There are 9 vents: 4 for AC, and 5 for heat.

The heater system draws air in through the clam shell on top in the picture above.  There's a fan right inside that blows air through the heater core and out to the vents.  The left and right ducts and the defroster are always getting airflow, and the two foot vents have a damper.  As far as I can tell, you can't recirculate the air, but I may be wrong.  Hopefully the electric heat will be sufficient without the recirc option, but I am in AZ so how bad could it be?  I tested the motor and it spins, so there must just be a problem with the switch or wiring.

The AC system (which is the next piece to come out) is located behind the glove box and suck air in from there (no fresh air option).  A separate fan sucks air through the evaporator and sends it down two ducts.  The smaller of the two goes to a vent below the passenger side dashboard.  The larger one serves the driver's side under dash vent and two center vents.  There's no damper, so you'd have to close off vents to reroute if you wanted.  The wiring looks suspiciously different, so I'm thinking the car didn't originally have the AC option and this was added later.  However it worked out, I'm definitely looking forward to the crotch level vent that I've only ever enjoyed on my friend's early 90's Cherokee!